Thursday 28 April 2011

How to Make Jam

Now you would think that at the ripe old age of fifty two, that somewhere along the way I would have learned how to can jam. The fact is, I was too intent on running away from my Mother to take much notice of her domestic forays. I sincerely regret it now. I realize not only do I not know how to can jam, I don't know how to can anything else either. Nor do I know how to sew anything more complicated than a straight hem or how to bake a pie. This is just the short list of things I can't do. I'm not a total moron, I actually know how to do all kinds of things, I'm just lacking on some of the domestic stuff.

So I've decided to remedy that and have enlisted my friend Shelley, the ultimate domestic goddess to teach me all she knows. Our first lesson was how to make strawberry jam. It was much easier than I thought it would be and I love the idea of making it myself without all the weird chemicals they put in everything these days. So without further ado, here is jam making 101.  Total time was about 30 minutes, start to finish

We used the recipe that came with the package of Liquid Certo Pectin

Tips for jam making success.
-sugar helps jam to set so don't cut down on the amount called for in the recipe
-do not double your recipe as it may not set, small batches are better
-measure ingredients carefully, prepared fruit or juice should be measured in a glass measuring cup  after chopping or crushing. Sugar should be measured in a dry measuring cup
-use firm ripe fruit or unsweetned frozen fruit that has been thawed in the fridge
-crush berries with a potato masher NOT in a food processor
-check your canning jars for any chips or cracks in the rims, don't use them if they are not perfect as this can affect the seal, you can re-use canning jars but must use brand new sealing lids each time
-it's important to used steralized jars, lids and utensils when preparing cooked jams
-using clean jars, pour boiling water over and in them as well as the lids  (can have the lids in a bowl to do this) leave them in the boiling water while making the jam, this is to steralize them ( you could also steralize the jars by putting them in the oven for 10 minutes at 225 F, the lids should have boiling water covering them, don't put them in the oven, just the jars)

Recipe

-Hull and crush 3/4 cups of strawberries. Put them in a pot and add , 7 cups of granulated sugar and 1/4 cup of lemon juice, mix this together and bring to a hard boil for one minute.

-Take off of the stove and add one pouch of the liquid pectin.

-As you stir it in, a lot of foam will be produced.  Stir and skim off as much as possible for 5 minutes for a nice clear product.( you can save the foam and use it like jam right away, or put it on ice cream etc as a nice sweet topping)

-pour out the boiling water in your canning jars and fill them right away with the hot cooked jam to about 1/4 of an inch from the top of the jar.

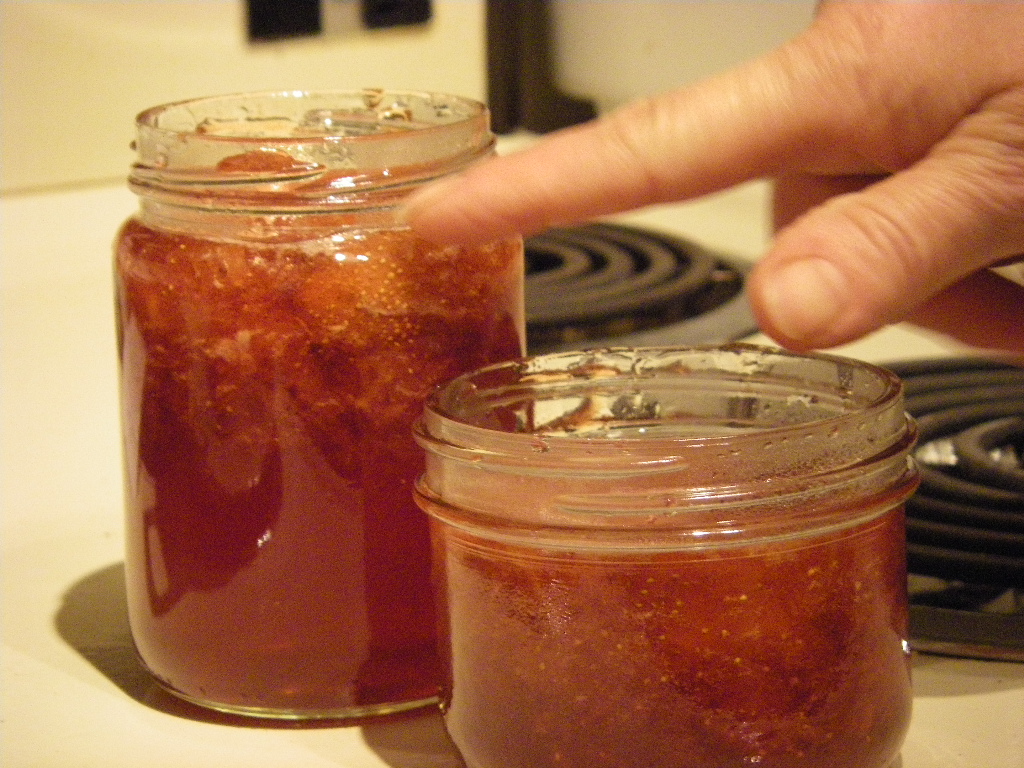
-VERY IMPORTANT- wipe the jar rims with a clean cloth to make sure there is nothing to prevent a perfect seal


-put the lids on and make sure the rings are screwed on very tight
- let cool at room temperature until the jam has set. Can be stored for up to a year at room temperature, refridgerate after opening


The jam turned out awesome but the process led me to ask some questions. Like what  the heck is pectin, why do we use it, what did they do in the old days when Certo wasn't available? So I did a little research when I got home and here is what I learned about the jam making process.

What is pectin?
pec·tin/ˈpektin/
Noun: A soluble gelatinous polysaccharide that is present in ripe fruits and is extracted for use as a setting agent in jams and jellies. 
Pectin is a "gum" found naturally in fruits that causes jelly to gel. Tart apples, crab apples, sour plums, Concord grapes, quinces, gooseberries, red currants and cranberries are especially high in pectin. Apricots, blueberries, cherries, peaches, pineapple, rhubarb and strawberries are low in pectin. Under-ripe fruit has more pectin than fully ripe fruit. Jellies and jams made without added pectin should use 1/4 underripe fruit.

Many recipes call for the addition of pectin. Pectin is available commercially either in powdered or liquid form.These two forms are not interchangeable, so use the type specified in the recipe. Powdered pectin is mixed with the unheated fruit or juice. Liquid pectin is added to the cooked fruit and sugar mixture immediately after it is removed from the heat. When making jellies or jams with added pectin, use fully-ripe fruit.

Pectin is concentrated in the skins and cores of fruit; that is why some recipes call for those to be included.

Commercial pectins may be used with any fruit. Many homemakers prefer the added-pectin method for making jellied fruit products because fully ripe fruit can be used, cooking time is shorter and more precise and the yield from a given amount of fruit is greater.

"The advantage to using pectin, is that you can make jam with a much shorter cooking time, which produces a product that tastes fresher. It also gives you a higher yield for the amount of fruit because you're not boiling all the liquid away until it reaches the gelling point. The results are also predictable and generally foolproof. It WILL gel most of the time."

"On the other hand, there is some charm to the long-cooked traditional jam flavour that a pectin-based jam doesn't have.The fruit almost caramelizes and there's a rich undertone to a jam made that way. However, some fruits just don't have sufficient natural pectin to gel properly - and so you either have to boil the heck out of it or be satisfied with a compote-y textured jam."

"The purpose of the lemon juice is to provide an acid for the pectin's magic to work. Any acid will do, but lemon juice usually contributes a pleasant, and not overwhelming flavor. If you look at the structure of a pectin molecule, it has branches. These branches need to become ionized in order for the pectin's colloidal properties to work. The acid allows the ionization to happen. Once that happens, the pectin chain can start attaching to other pectin chains, which creates pockets that hold onto liquids and other stuff, which in turn creates the gel that we recognize as jam. Someone with a lot of jam-making experience can intuit how to adjust the ratios of sugar, acid, and pectin to optimize the gelling properties."

Some tips from the Woman's Home Companion Cookbook:

"Tough Jelly: too little sugar for the amount of pectin; also overcooking."
"Syrupy Jelly: Too much sugar for the amount of pectin; juice too low in pectin or acid content or both."
The book also states that you can test for the amount of pectin in the fruit by gently stirring together 1 tablespoon of the juice with 1 tablespoon of alcohol. If a large mass of jelly is formed, the juice is rich in pectin. If several less firm pieces of jelly are formed the juice is moderately rich in pectin. And if only small flakes form...it is poor in pectin.

Want to make your own pectin? Here is a recipe using green (unripe) apples

green apple pectin
as many pounds of green (unripe) apples as you like
double the amount of cups of water

yield: approximately one cup pectin stock per pound of apples


1. stem & coarsely chop apples, blemishes are fine to leave in but discard any parts gone bad, bruises or worm bits.  make sure to leave cores and seeds in.

2. place in non-reactive pan (stainless or enameled iron only) and add water. bring to the boil, reduce heat and simmer for 20 minutes. stir a few times throughout to make sure all apples get saturated.

3. line a colander with cheesecloth or butter muslin and place over a bowl. pour in cooked apple mixture. let drain for 2 hours.

4. return strained liquid to pan and boil down by half.

place in fridge to use in 2 weeks, freeze for up to 2 months, or
hot water bath can for larder storage up to a year. if you choose to hot water bath, leave 1/4 inch head space and process for 10 minutes.

2/3 cup of good apple pectin stock will be sufficient to set 4 1/2 pounds of medium or low pectin fruit to jam.

to make jelly use equal cups of stock & sugar, and some added lemon juice. generally 2 tablespoons of lemon juice to 3 cups stock/3 cups sugar will do it.
Do you have any experience making jam?
Do you have a favorite recipe you would like to share?

Join us next time for a "how to make homemade wine from fresh berries" tutorial

Did you like this post?
Share it! Tweet it! "Like" The Eclectic Ark on Facebook!
Thanks, your awesome,


Join us at Cindy's Show and Tell Friday 

Monday 25 April 2011

How I Built My Dream Closet

 If you followed my other blog you probably weren't keeping count but in a space of 4 years, I moved seven times. As a result, I kept packing up my clothes, then as each new season rolled around and I couldn't find suitable clothing to wear, I would hit the thrift stores and stock up. Well twelve seasons later and I now have the equivalent of a small store worth of clothes. What to do with them all, where to put them??


The house has two smallish bedrooms upstairs, one at each end of a long windowless space that is 40 feet long by about 16 feet wide with sloping ceilings. Neither bedroom has any storage whatsoever, no closets, shelves etc. I decided to build a walk-in closet in one third of my attic space.I really had to think about how I was going to do this as the ceiling is not high (six feet) and I wanted to leave a walkway down the center for ventilation and access to the (future) bathroom.

Here is the before of my attic cave. I cleared away the front third of this room


Standing in the room and looking to the right wall

 Standing in the room and looking back at the wall with the entrance. The shelf unit was a freebie from Craigsist.
There were about 10,000 staples in the wood which I spent a day removing and then used a metal scraper to smooth over any bits of wood that were loose or protruding. I can't afford fancy wall coverings so am just going to paint the OSB panels.


Two coats of primer and one coat of paint later and it's definitely looking brighter in here now.
Beside the shelves is a hanger for my belts. On the left wall is my shelf for hanging short clothes. I got the white wire shelves for free on CL and bought ceiling hooks and chain to suspend them from the ceiling.


Another short shelf for jackets was suspended at a 90 degree angle from that one. I bought the chain as one long length and had Dave use a zip cut disc on an angle grinder to cut the chain where necessary.( I'm a scaredy cat when it comes to sparks, so let him do that job!)
Another long shelf was added to hang all my long clothes


And here is the after... ( bear in mind, I'm not finished, eventually there will be a wall behind the dresser and the rest of the attic will get painted as I shuffle my boxes of stuff around)

This is the view from the entrance. The white dresser was a $25 CL find and has a full length mirror. The drawers hold my underwear, bras and socks. I have added a wicker seat to sit and put on shoes. The shoes are all on shelves to the left.


In between the shoe shelves, I have hung a small shelf with hooks to hang all my purses.


Behind the seat is the hallway that continues through the attic, on the other side of that is all the hanging clothes. The rack in front has hooks on the left with scarves on it and long dresses on one side. The backside is fancier dresses and seasonal things like scuba suit, ski suit


Sorry for the blurry picture( don't have lighting installed up here yet...probably have to go with inset pot lights as there is no headroom for a hanging fixture) This is a look at the backside of the long clothes on the left, coat rack in front and the short rack on the right.

The shelf is fully loaded with all my pants, sweaters and tops.

It looks amazing in person, the pictures don't really do it justice. There is ample room to walk around everything. It looks like a small store. I am LOVING it!! It is so awesome to walk in and easily see everything in a glance. Picking out an outfit and getting dressed is a snap now.

Stayed tuned for the continuation of these Reno's. I will be building a linen closet behind the right side of this closet and a bathroom behind that with another smaller walk-in closet behind that. The left side of the attic behind the dresser will be a large storage area and a flight of stairs to finish things off. Just waiting  for the last gasp of winter to pass us by, it's supposed to go to minus 16 tonight , brrr.

Do you love your closet? Have you come up with some good storage solutions, if so please share!

Did you like this post?
Share it! Tweet it! "Like" The Eclectic Ark on Facebook!
Thanks, your awesome,

Giving Thanks

I was out of town on Salt Spring Island last weekend taking a course for my massage therapy continuing education, so didn't get a chance to work on things around the house but this weekend was very productive.Slowly but surely I am making some headway. I'm still working on the kitchen but can see light at the end of the tunnel now. The walls are all painted, the cabinets painted, knobs for the cabinets... you guessed it, .. painted as well.


The original white knob on the left, how they look painted green to match the kitchen colours on the right. Quite proud of myself for thinking of stringing them up on fishing line to paint all sides of them at once.

I got the two leaded glass sliding doors re-sized and proper handles put on them and they are now installed.
( Go here to find out exactly how I made small doors bigger so they would fit the frame) The upper kitchen cabinets have been installed and the plumbing for the sink and dishwasher has been run through the walls.

The next step is to sand and varnish the floors which should take up most of my next group of days off. Once that's done, I can install the base cupboards and hook up the sink and dishwasher. I'm supposed to have an electrician here tomorrow to finish the job of hooking me up. I really hope he comes and does the job. I've been camping in here since July. I didn't mind at all in the summer, but it is getting colder and darker in here every day. If the temperatures drop much more I won't be able to stay here without heat.

If I get power hooked up, there are baseboard heaters in some of the rooms and I have portable heaters I could use in other rooms. I have a wood stove but am waiting to finish running the plumbing through the walls and floors before finishing the floor and setting up the stove. Also I have to cut a new hole in my house for the chimney and am nervous about doing that right. Don't want any leaks, don't want 15 feet of chimney swaying in the breeze either, not sure yet how I am going to do it. The other issue with wood stoves is keeping them going. I have no wood and nowhere to store wood,... meh!

I have so much to be grateful for in my life right now. I want to thank the universe for providing me with this opportunity, Daryl and my Dad for backing me financially, David for giving me a place to work on things, my friends who helped me move, gave me a hand with my projects and dragged me out of here on occasion to come up for air. A huge THANK YOU to each and everyone of you, from the bottom of my heart. Happy Thanksgiving and a Happy Birthday to my Dad who has the auspicious birthday of 10/10/10 and is spending it at the pyramids in Egypt. Hope your having the birthday of a lifetime Dad, you deserve it!


What are you thankful for?

Did you like this post?
Share it! Tweet it! "Like" The Eclectic Ark on Facebook!
Thanks, your awesome,

How to Make a Portable Steam Room

I love to pamper myself with spa treatments but can't always afford to go. I prefer a steam over a sauna as I find the dry heat of the sauna hard on my lungs. Here is what I made so I could have a steam in the comfort of my own home. Best of all it packs away so it's not taking up space when not in use.


What you need:


-4 cotton curtain panels


-an electric deep fryer( the old fashioned kind, round with a basket that lifts out and a glass lid) I found mine at the flea market for under $20

-a chinese umbrella with bamboo/wood spines ( I cut the handle off and tied a strong rope around the knob on top to suspend it)
- a ceiling hook to hang the tent
-velcro

 Method
-Sew the curtain panels together to create a tent, use the velcro to make three closures at the opening
-place the deep fryer minus the lid and basket inside the storage stool
-drape the tent over the open umbrella and hang it from a strong hook in the ceiling
-half fill the deep fryer with water and any herbs you want to use in your steam and turn it on hot enough to bring the water to a boil
-sit in the tent on the stool with the opening velcroed shut and enjoy the steam

The tent can be taken down and folded up to fit inside the stool with the deep fryer when not in use
Pamper yourself and enjoy, you deserve it!


What do you do to pamper yourself?

Did you like this post?
Share it! Tweet it! "Like" The Eclectic Ark on Facebook!
Thanks, your awesome,

How to Resize a Door

I guess most people would have taken the measurements of their door frame and just made sure they got a door that fit that size. I'm not most people. I saw these beautiful doors offered for free on craigslist and knew I had to have them. I didn't know or care what size they were, I just wanted to incorporate them into my home. I finally decided I wanted them in the two doorways in my kitchen. If you look closely at this picture you can see that the door is about 2 inches taller than the door frame and 2 inches narrower. Not to mention they were originally sliding doors so don't have the proper hardware to latch it closed. Not one to be daunted by such impracticalities, I set about making the door fit the frame. I had the good fortune to have the most amazing teacher help me with this. The furniture that he builds is stunning one-of- a-kind  gallery pieces, so I was very blessed that he took the time to help and teach me.

The first thing we did was cut 2 inches off the bottom of the door. There was a gap of an 1/8 of an inch left at the bottom and top of the door for air flow. It was wider at the bottom than the top so losing 2 inches from the bottom actually made it look more balanced. Mike then cut two, one inch strips of wood the length and thickness of the door which were glued and nailed on to each side. He removed the brass  hand plates and cut a piece of wood to fill the space and glued and nailed it into place. After spending the night with clamps while the glue dried, it was ready for the next steps.
  A closeup of the new edge and filled in section

I used this metal piece to scrape off any excess glue by holding it at a 45 degree angle and pushing it forward in a scraping motion to loosen any lumpy bits
Mike then instructed me on how to use the sander to smooth the edges of the new pieces to be level with the door. We did a big chunk of the work with this sander , then I went over it all with a palm sander to get it really smooth. Any gaps, holes, dents etc were filled in with a wood putty and left to dry. Later I went back and sanded those down as well.


 Once all the sanding was done, I used a router to go around all the edges so they had a slightly rounded look to them. Once I finished with the router, I took a piece of sand paper and bent it over the edges and sanded them all to an even finish.
 Next job was to create the inset for the hinges. I used a thin stick cut the same length as the door and went and measured where the hinge marks were in the door frame and marked them on the stick. We transferred the dimensions to the door and traced around the hinge to mark it out. Mike then used a different router to carve out the space.
 You can see the new hinge space he just carved at the top end of the door.
 He went back with a hammer and chisel and cleaned up the edges and made sure it was flat inside

 Once that was done it was time to install the hinges. He used a special tool to mark the center of each screw hole so that the hinge  screws would go in straight and flush. Here he is gently tapping it into place
 The last step was to drill the new holes for the door handle. He measured up from the bottom of the door to the height he wanted the handle and made a mark. he then measured in 2 3/4 inches to the depth the handle would be from the edge of the frame. Then using a large drill bit he carefully drilled out the hole on low speed. One thing he did first was to clamp a piece of wood under where he was drilling to prevent the hole from splintering outward as he went through.
The last step for which I don't have a picture was drilling the hole for the latch. He made sure it was centered in the wood and in relation to the larger hole. Using a one inch drill bit he carefully drilled into the larger hole.

Once all the woodworking was done, I painted the doors first with a coat of primer and then the top coat. Tomorrow we will install the doorknobs and hang the doors in the frames. Once the doors are in , I can start on the next project which is to get the floors sanded and stained. I can't wait to get my kitchen up and running.

I'm so grateful to Mike for showing me how to do this. I'm sure it is a skill I will be using a lot as I have a huge collection of salvaged windows and doors that I will need to adjust to suit my purposes.

Have you altered something to make it fit or re- purposed a salvaged reno item?

Did you like this post?
Share it! Tweet it! "Like" The Eclectic Ark on Facebook!
Thanks, your awesome,


Everything I Know About Painting a Room

Well I'm still here. I haven't spontaneously exploded in a big ball of frustration. I'm still not a big fan of painting but after doing some research, I managed to do not a bad job of it this time. I haven't attempted to paint too many times in my life. The few times I have, I have not been very pleased with the results. That being said, I never thought of painting as a skill with certain theories to learn. This time ( and to procrastinate a bit longer) I spent some time online and with professional painters and got some advice on how to do it right.


This is what I learned.

-Use good quality paint. It does make a difference. I went to General Paint to get mine.

-Different types of paint (latex, oil etc) are used for different applications. Different finishes ( glossy, eggshell etc) are used for different applications. Ask questions at the paint store to make sure you get the right product for the finish and durability you are looking for.
In general:
 - These days latex paint is good for all interior and most exterior applications. Latex also has the
advantage of longer lasting colour that doesn't fade so much, and also doesn't become brittle and crack off the way oil paint will. Only metal or cement MAY (but probably not) require an oil based paint.
 - Flat paint on walls will hide flaws better than something with a shine, but is not washable.
 - Generally an eggshell finish is good for walls, and semi-gloss for trim, doors, kitchens, and bathrooms
    (all the areas that need more frequent wiping down)

-Use good quality brushes and rollers. It does make a difference.

-The rollers have different nap size for different applications, find out which one you need for your job.A 20 mil nap on the roller sleeve is good for most indoor work. For areas you want a super smooth shiny finish, like cabinet doors, use a thin foam sleeve or a 10 mil woven sleeve.

-A 2 1/2 inch nylon angled sash brush is good for all interior work. Brushes should be fairly stiff, not soft. This will allow you to draw straighter lines along trim or where walls meet ceilings or floors.
For exterior work on rough surfaces you will want 25 - 30 mil nap and a three inch brush.


-Brushes come in different kinds. Some are for the type of product you are applying and they can have different shapes and sizes depending on what you want to do with them. I used a brush wide enough to do my trim in one sweep. My brush for cutting in had a chiseled edge which helped me get closer to the edges without touching the other side.

Hold smaller brushes like a pencil, hold a wall brush with your whole hand


-Always lightly sand your walls first. ( if they are really greasy, I would recommend washing them with a mixture of TSP and water to remove all grease and dirt)

-Go along the walls and trim with a metal paint scraper and remove any lumpy things

-Always use a good primer first. It will save you paint in the long run and give you a better finish

-Remove as much furniture as possible, a completely empty room is the best

-Cover the floors with a drop cloth and tape or tack it down

-If your painting the ceiling too, start there first, then paint your trim, then do the walls last especially if you are using a trim colour that is different from the wall colour, paint the trim first. It is easier to draw straight down the frame with the wall colour after than it would be to paint that tiny edge without getting any on the wall.


-Before you start, take the brushes and rollers that you will be using and get them wet with the appropriate solvant( water for latex,paint thinner(mineral spirits) for oil base etc)squeeze out the roller, shake out the brush and dry them lightly on clean white paper or a brown paper bag( not newspaper, the ink can come off onto the brushes) (Rick who helped my write this article, doesn't do this step. The source I read said it helped the brushes load better when you do this. I did it and had no negative effects but it may not be neccesary according to Rick)

-Make sure you have clean cloths and the appropriate solvent handy to wipe up any spills or dribbles as soon as they happen ( don't wait until they are dry)

Ok, now your ready to start painting

-Place your paint can and tray on a drop sheet. You can place your paint can on a paper plate in case it dribbles and you don't want to track it around on the floor.

-Gently pry off the lid with a flat head screwdriver.You can take an awl and poke some holes around the inside lip of the can so that any excess paint from pouring will drain back into the can.

-After pouring paint, wipe out the rim of the can with your brush (don't let the paint pool and dry in the rim - that would interfere with sealing and opening the can again)


If you are not going to use the whole gallon, pour a small amount of paint into an extra empty can to use for brush work. Only pour about two inches into the cutting can so you when you leave the brush standing in the can the paint comes half way up the bristles.

Don't work out of the original can unless you are going to use all of it at once.


-Pour an appropriate amount into the roller tray(about half full) or a hand held smaller container and put the lid back onto the can IMMEDIATELY and FIRMLY ( go around the top of the lid with a rubber mallet to seal it)This keeps the paint from drying out, getting cooties in it and most importantly spilling everywhere when the can gets knocked over ( and karma says it will if you don't close it tight each and every time!!)

-Don't drench your brush or roller in paint

-Don't try to paint a large wall all at once. Break it down into sections ( I did sections about 5-6 feet across.)

-Start by cutting in. This is the boring,tedious part of the job. If you take your time and pay attention, you can paint your whole room without having to tape it all off( another job that can take hours and if not done with great precision will result in paint being pulled off where you don't want it to be) Don't try and cut the whole wall at once, do it in sections so that the wet paint will blend with the roller work. If the paint dries before you roll the middle, it will always be obvious.

-Dip your brush about one third of the way into the paint( not up to the base) and gently plunge it up and down a few times to load the bristles.Lightly scrape off the excess. You can't rush this process, better to
apply paint twice for good coverage, then try and load the brush too full the first time and have it slop everywhere. Paint slowly to avoid splattering paint.

-Place your brush on the wall an inch or so from the corner, press down gently on the bristles until they fan towards the corner. Just as they touch the corner, pull the brush across the wall. Continue in this method, making short horizontal strokes all the way up the wall, from the floor to ceiling. Go back over the horizontal stripes with a long vertical one, starting at the bottom and working upwards to avoid paint pooling.

-Along the ceiling edge do the same thing but pull the paint down, then across.

-Once you have marked out all the borders of the wall potion you are working on in this way, you can use the roller to fill in the middle

-For the roller, run it down the tray until it is half way into the paint and pull it back onto the rough portion of the tray. Do this a few times until the roller is nicely loaded with paint. Roll back and forth over the rough portion until it is evenly loaded without being saturated and rolls smoothly. If it slides without rolling , its too full of paint!

-Pick a spot in the middle of the wall and touch the roller to it and start to roll up and away from you. Make a large W or M on the wall, then come back and fill it all in with up and down strokes. Don't try and start at one end and just up and down all the way across, do the M thing and fill in, it gives a better looking finish!

There doesn't that look great! Now just continue painting sections of wall until you are finished, wiping up dribbles and splotches as they happen if necessary.

Hey wait! Before you go running off to have a beer to celebrate, there is one more thing to do.

Go clean all your equipment right away. Those good quality brushes you bought are meant to be used more than once. Give them and any paint trays etc a good washing with the appropriate solvent until all traces of paint are removed. (if you leave old paint in the paint tray and try to use it again, the fresh paint will soften the old and they will mix together possibly giving you an effect you weren't looking for)

-Gently dry them off on by squeezing them lightly in an old clean towel and store them back in the plastic sleeves they came in to keep them supple, clean and ready to use for the next time.

Update: here are a few more tips I've learned
-If you are using a can of paint more than once, you should strain the paint before using it as it will have dried bits in it.
-If you will be returning the next day to finish a painting job , you can wrap the roller in saran wrap and put it in the fridge overnight without washing it out. Always wash your brushes though, even half way through a large job is good to get a better edge.

Now go and celebrate your fresh new space.Happy decorating,

Did you like this post?
Share it! Tweet it! "Like" The Eclectic Ark on Facebook!
Thanks, your awesome,

How I Spent Labour Day

Labouring of course, silly!
I don't know if it's the name of the day, but I always seem to be working extra hard on labour day. This year was no different. I've been procastinating about painting my kitchen as I've never had very good results with my painting techniques. This year I took the time to research and ask some questions from the professionals and wrote a post about all I learned in the process.

Finally armed with some knowledge, lots of supplies and a room pre-painted with primer by my good friend and expert painter, Rick, I was ready to tackle the job. Boy what a difference some knowledge makes! It still wasn't my favorite activity in the world but I am more than happy with the final results and no mess at all to speak of, whoohoo!

The next day, once the paint was dry, I really wanted to get a sense of how the room was going to look when I was done. I still need to refinish the floors(which I really should have done first) but I couldn't wait. I huffed and puffed and dragged all my kitchen appliances and cupboards through-out the house and into the kitchen. I then spent an agonizing 12 hours rearranging everything like a giant (HEAVY) jigsaw puzzle until I was happy with the final configuration of things. I can finally see what the room will eventually look like.

I still have lots of work to do yet. The floors need re-finishing, I need to build a stand for the sink and dishwasher so they are at the same height as the counters. I will be painting all the cupboards,finding and installing a counter-top and handles,installing light fixtures, plumbing in the sink and dishwasher, hooking up the stove to the propane after running propane hose through pipe from the balcony(storage area for the propane bottles), building a shelving unit for the other wall with glass doors and decorating in general. Wow, writing that list just took the wind out of my sails.....oh well, onwards we go, it will be done one day.

The day after that I was too sore to do much of anything physical, but it was a great day nonetheless. I had an epiphany!!! I was finally able to visualize the open downstairs space. It was weird, even though I could see through the open framed walls, I couldn't seem to see past them. In frustration, I started hauling large items around and arranging them where I wanted walls be so I could get a sense of the space I wanted to create. Armed with a measuring tape , I scurried around for hours planning and plotting and making sure everything would fit and traffic flow would be comfortable and I think I am happy with the results. The beauty of this, is now that I know what I want and where everything is going to go, I know what I need and don't need out of my pile of stuff and I can make a coherent list of projects in some kind of chronological order that makes sense. In a way, that was one of the biggest jobs of all! I am so happy to scratch that one off the list.

So here are a few pics of the kitchen in its rough form, you will have to work with me and use your imagination for some of these pictures but I assure you , It will look great when it is finished. Keep in mind the house is over 100 years old, so I am trying to keep some of that character in my design.

This picture is what you would see as soon as you walk in the door. There was a tiled corner there originally for a wood stove but after inspecting the chimney, I found out it was so far away from code as to be nothing but a danger, so no wood stove in that corner. Instead I ripped out the tiles, placed the corner cabinet there and will be building shelves that radiate out on either side. The white window frames you see there will be glass doors for the shelves. The white cabinets you see will be placed up on the wall over the shelves.


Looking to the left in the room, you have the stove and some of the kitchen cabinets( they aren't mounted to the wall yet, so will be higher than in this pic as well they still need to be painted)
Looking down that wall you see my kitchen sink project with a sunshine ceiling fixture that will be installed over the sink.

This chandelier will be going over the table
Over by the front door I have placed a small bookcase which I am going to finish with those windows leaned up in front of it. On top is two of the oak spoon racks I found last year that will be reworked into spice cabinets and mounted higher on the wall.


I've been playing around with different ideas for the doors in the kitchen. This doorway leads to the room beside the kitchen and I like the glass letting all the light in.
I actually have an old dutch door with a window in the top that will be my front door but it was too heavy to move into place by myself , so I placed another glass door here for the moment to get a sense of the view and light I would be able to have.
tablescaped table. Wish me luck, or better yet, pop by and lend a hand.

Nothing is in stone yet, so if you have any great ideas, speak up and let me know what you would do if this was your kitchen.


PS, pretty much everything you see in all these pictures I got for free or very cheap, except for the chandelier everything is recycled. I paid $50 for the chandelier and saw the same one yesterday at Home Depot for $180. I paid $100 for the stove which cost over $1000 new. So far my biggest expense for this room has been paint and painting supplies, about $200 with Ricks discount. I'm guesstimating that my total costs what with what I've already spent and the rest that I need will be about $1000 total. That includes renting a floor sander, buying varnish and applicators, plumbing supplies, knobs and hardware for doors and cupboards, paying someone to install my doors and wire in my light fixtures. Not bad for a kitchen from scratch.


Did you like this post?
Share it! Tweet it! "Like" The Eclectic Ark on Facebook!
Thanks, your awesome,

The Eclectic Ark